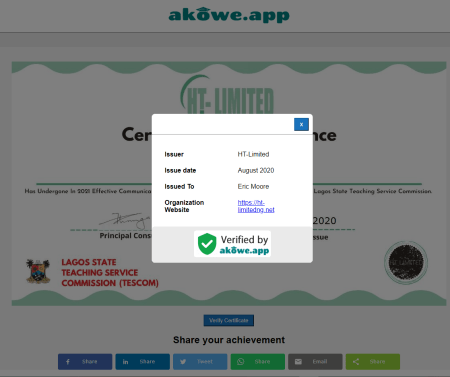
This post will show you how easy it is to send certificates using Akowe’s blazing fast Certificate Issuance Engine. As an educator, issuing certificates to the participants of your program is an integral part of your training program. Akowe makes issuing certificates a very simple process. We can issue 1,000 certificates in less than 30 minutes.
What do you need to send certificates using Akowe?
To use Akowe for sending certificates you only need 2 Items namely:
- Your Certificate Design in JPG or PNG format – You are likely to already have a soft-copy of your certificate. Please make sure the Name field and the Issue Date field of your certificate is left blank. Akowe will automatically print the names and issue dates for you.
- List of Recipients in CSV format – Prepare the list of recipients of the certificate. We have included a sample CSV file that you can modify. The list of recipients has 5 important columns as follows: First Name, Middle Name (Optional), Last Name, Issue Date, Email Address. All fields, except the middle name, are required. If there are errors on your list of recipients, you will be notified after uploading it and you would need to correct the errors.
I have these items, what next?
The Issuance Engine is designed with you in mind, and we are constantly improving its features and performance. Listed below are the three steps needed for issuing your certificates to your training participants.
- Upload the Certificate – Once you have signed up as an Educator, you will be redirected to your dashboard where you can upload your certificate design. Here are a few things you can do once you have uploaded the certificate.
- You can drag and drop to a position where the recipients name should be printed.
- You can drag and drop to a position where the issue date should be printed.
- You can select from 80 different fonts for the recipients name and issue date.
- You can select bold or italics for the recipients name and issue date.
- You can choose your preferred colour for the recipient name and issue date.
- Once you are satisfied with the settings, give the template a name ans save it to your dashboard. You will be able to use the template for your future recipients.

- Upload the list of recipients – You should start off with our provided sample CSV file. The columns should be in the exact order as provided. Do not rearrange the columns and please make sure that the first row holds the column titles. Please make sure to prepare your list adequately. The contents of the list is what the application will print on the certificate, so make sure you confirm name spellings, issue dates and email addresses. The columns in the list should be ordered as follows.
- First Name.
- Middle Name (The column is required but this field is optional as some of your recipients will not have middle names, you can leave their cells blank).
- Last Name.
- Issue Date.
- Email Address.
Once you have uploaded your list, we will show you if there are any existing errors in your list, eg, syntax errors in email addresses, blank first names or blank last names. You will be unable to proceed until you have fixed these errors. You can also fix these errors within the application.
- Send – As an educator who is authorized to issue certificates to your program participants, your organization will be listed as the Issuer of the certificate. This is already part of the steps you take while updating your profile. In the final phase of your preparation to send the certificates, here are a few things you can do.
- The Sender Name will be automatically set to your Organization’s Name, which you set up in your profile.
- The Reply-to email address will be automatically set to your reply-to email address which you set up in your profile.
- You can add an appropriate subject for the email
- You can add a body of the email, congratulating the recipients.
- Your organization’s logo will be automatically added to the top of the email. This logo is also compulsorily set up in your profile.
- A unique link to the certificate for each recipient will be automatically added to the bottom of the email. You also have an email preview showing you what the email will look like.
- Once you click on the send certificates button, the issuance process will begin. You will be able to monitor the progress as the certificates are being issued to each recipient.
After I send Certificates, what next?
Your recipients will get their certificates via email. Your Organization name will show up as the sender and they will be able to reply you directly via the reply-to email that you set. Many of them will reply you with thank you messages. The email contains a unique link for their certificate. Once they click on this link their certificates is displayed to them. They can download it as a PDF file if they wish.
We also offer the recipients an opportunity to create a digital wallet on Akowe where they can save their certificates to. The Digital Wallet will then hold their certificate for easy retrieval, easy sharing on social media and easy verification.
Verification of Certificates
As is often the case with certificates, employers and recruiters often need to verify the authenticity of certificates. Clicking Verify Certificate button on the certificate page will display the necessary verification information for that certificate.


Leave a Reply